Fine-tuning & running inference with RETFound
RETFound, developed by researchers at Moorfields Eye Hospital and University College London, is the first foundation model trained on retinal images.
Why use RETFound?
Previously, training AI to analyse retinal images required building separate models from scratch for each disease—a time-consuming, expensive, and data-intensive process.
With RETFound, you can start with a pre-trained model, fine-tune it for a specific disease or classification task, and train on fewer labeled images using just a single GPU.
This means faster, more efficient AI model development, unlocking new possibilities for analysing retinal diseases.
Getting started
In this tutorial you will learn how to:
- Connect a training dataset of retinal images.
- Fine-tune RETFound for a specific classification task.
- Run inference on a new dataset using your fine-tuned model.
By the end, you will be able to adapt RETFound to your research needs and generate insights from retinal images with ease.
Step 1: Connect a training dataset
The training dataset will need to consist of retinal images grouped into categories (classes) that the fine-tuned model will learn to recognise.
Connecting OCTs? Make sure your dataset consists of individual B-scan images rather than full volumetric scans as RETFound does not classify volumetric scans.
Organising the dataset
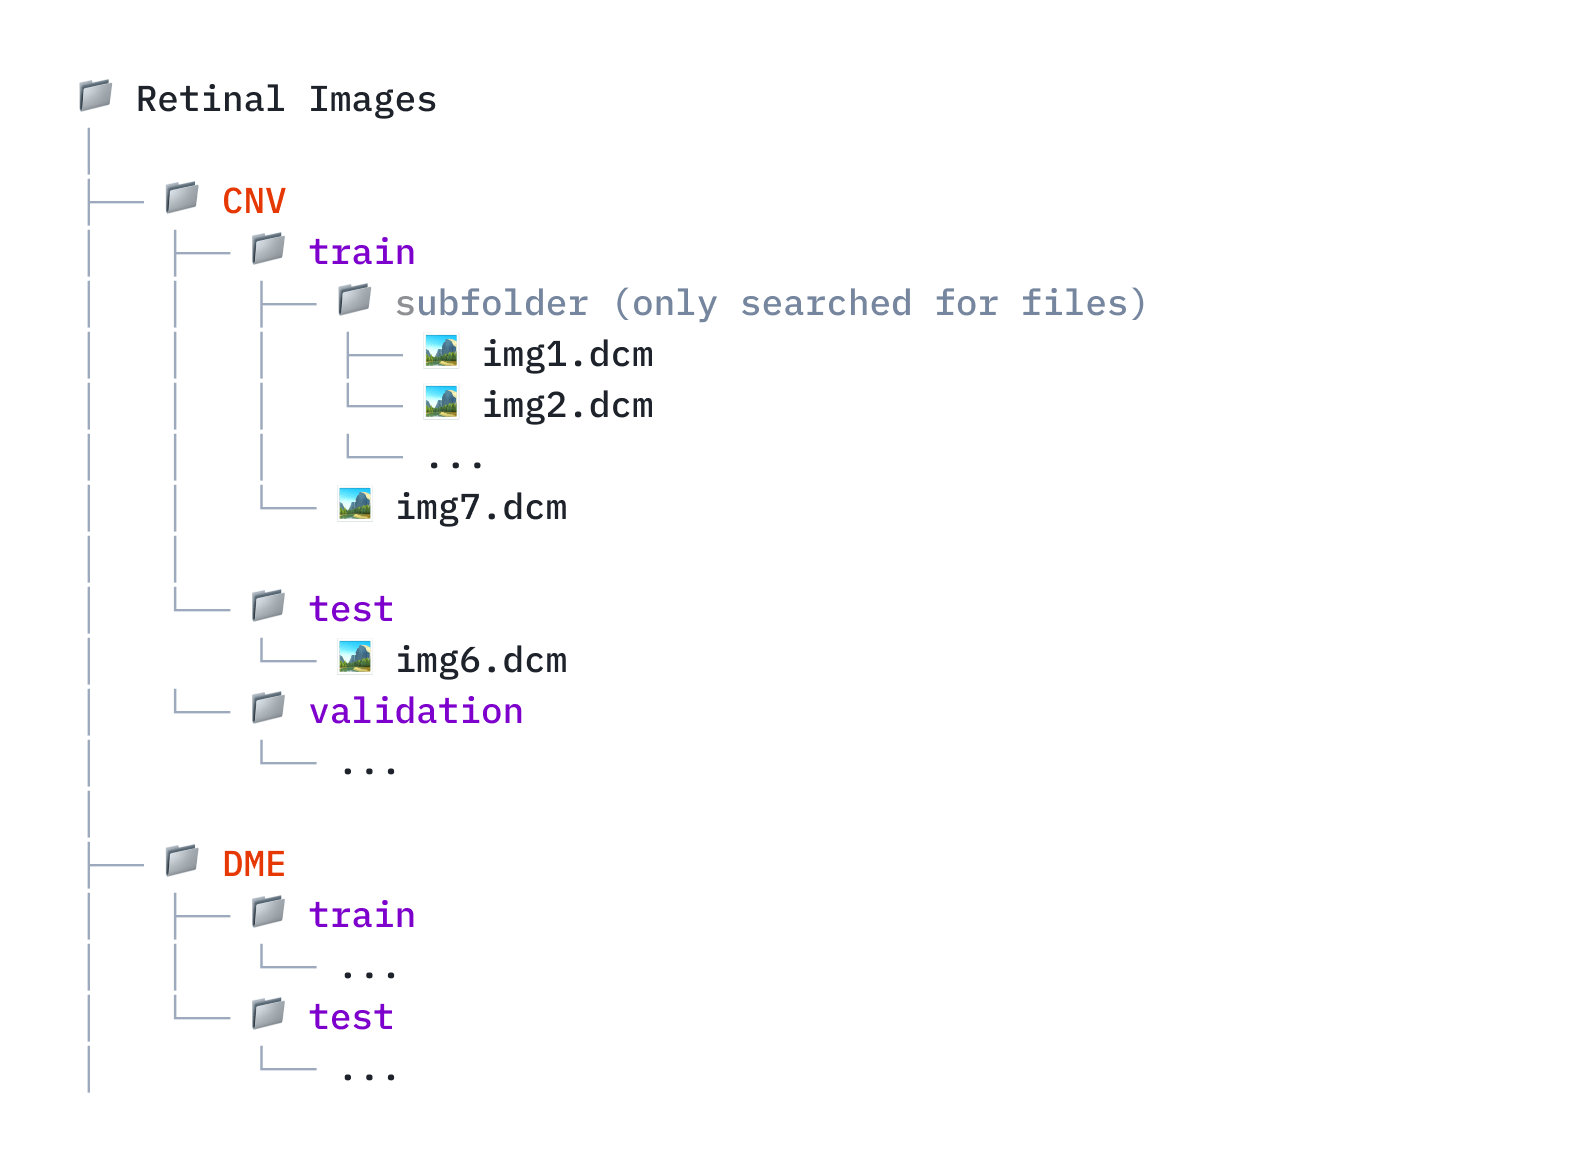
Before connecting the dataset, arrange your image files into the following folder structure:
📂 Dataset folder (top-level folder you will connect to Bitfount)
📂 Class label folders (subfolders representing different diseases or severity levels)
📂 Data split folders (separate folders for train, validation, test splits, e.g. 60–80%
training, 10–20% validation, 10–20% test)
Connecting the dataset
- Connect the dataset from the Datasets page in Bitfount, or connect a new dataset directly when linking a dataset in the demo project.
- Choose the folder that contains your images.
- Make sure you check the option,
Use folder names and structure for training tasks. - Connect the dataset.
Folder-inferred data splits and class labels are only supported for DICOM or Heidelberg formats. Contact our support team if your data is in another format.
Step 2: Fine-tune the RETFound model
Fine-tuning adapts RETFound to your specific dataset, optimising its performance for your research.
Setting up the fine-tuning task
- Join the RETFound fine-tuning demo project.
- Link your training dataset to the project.
- Select the relevant RETFound model. Ensure the model version matches your dataset (OCT or Color Fundus).
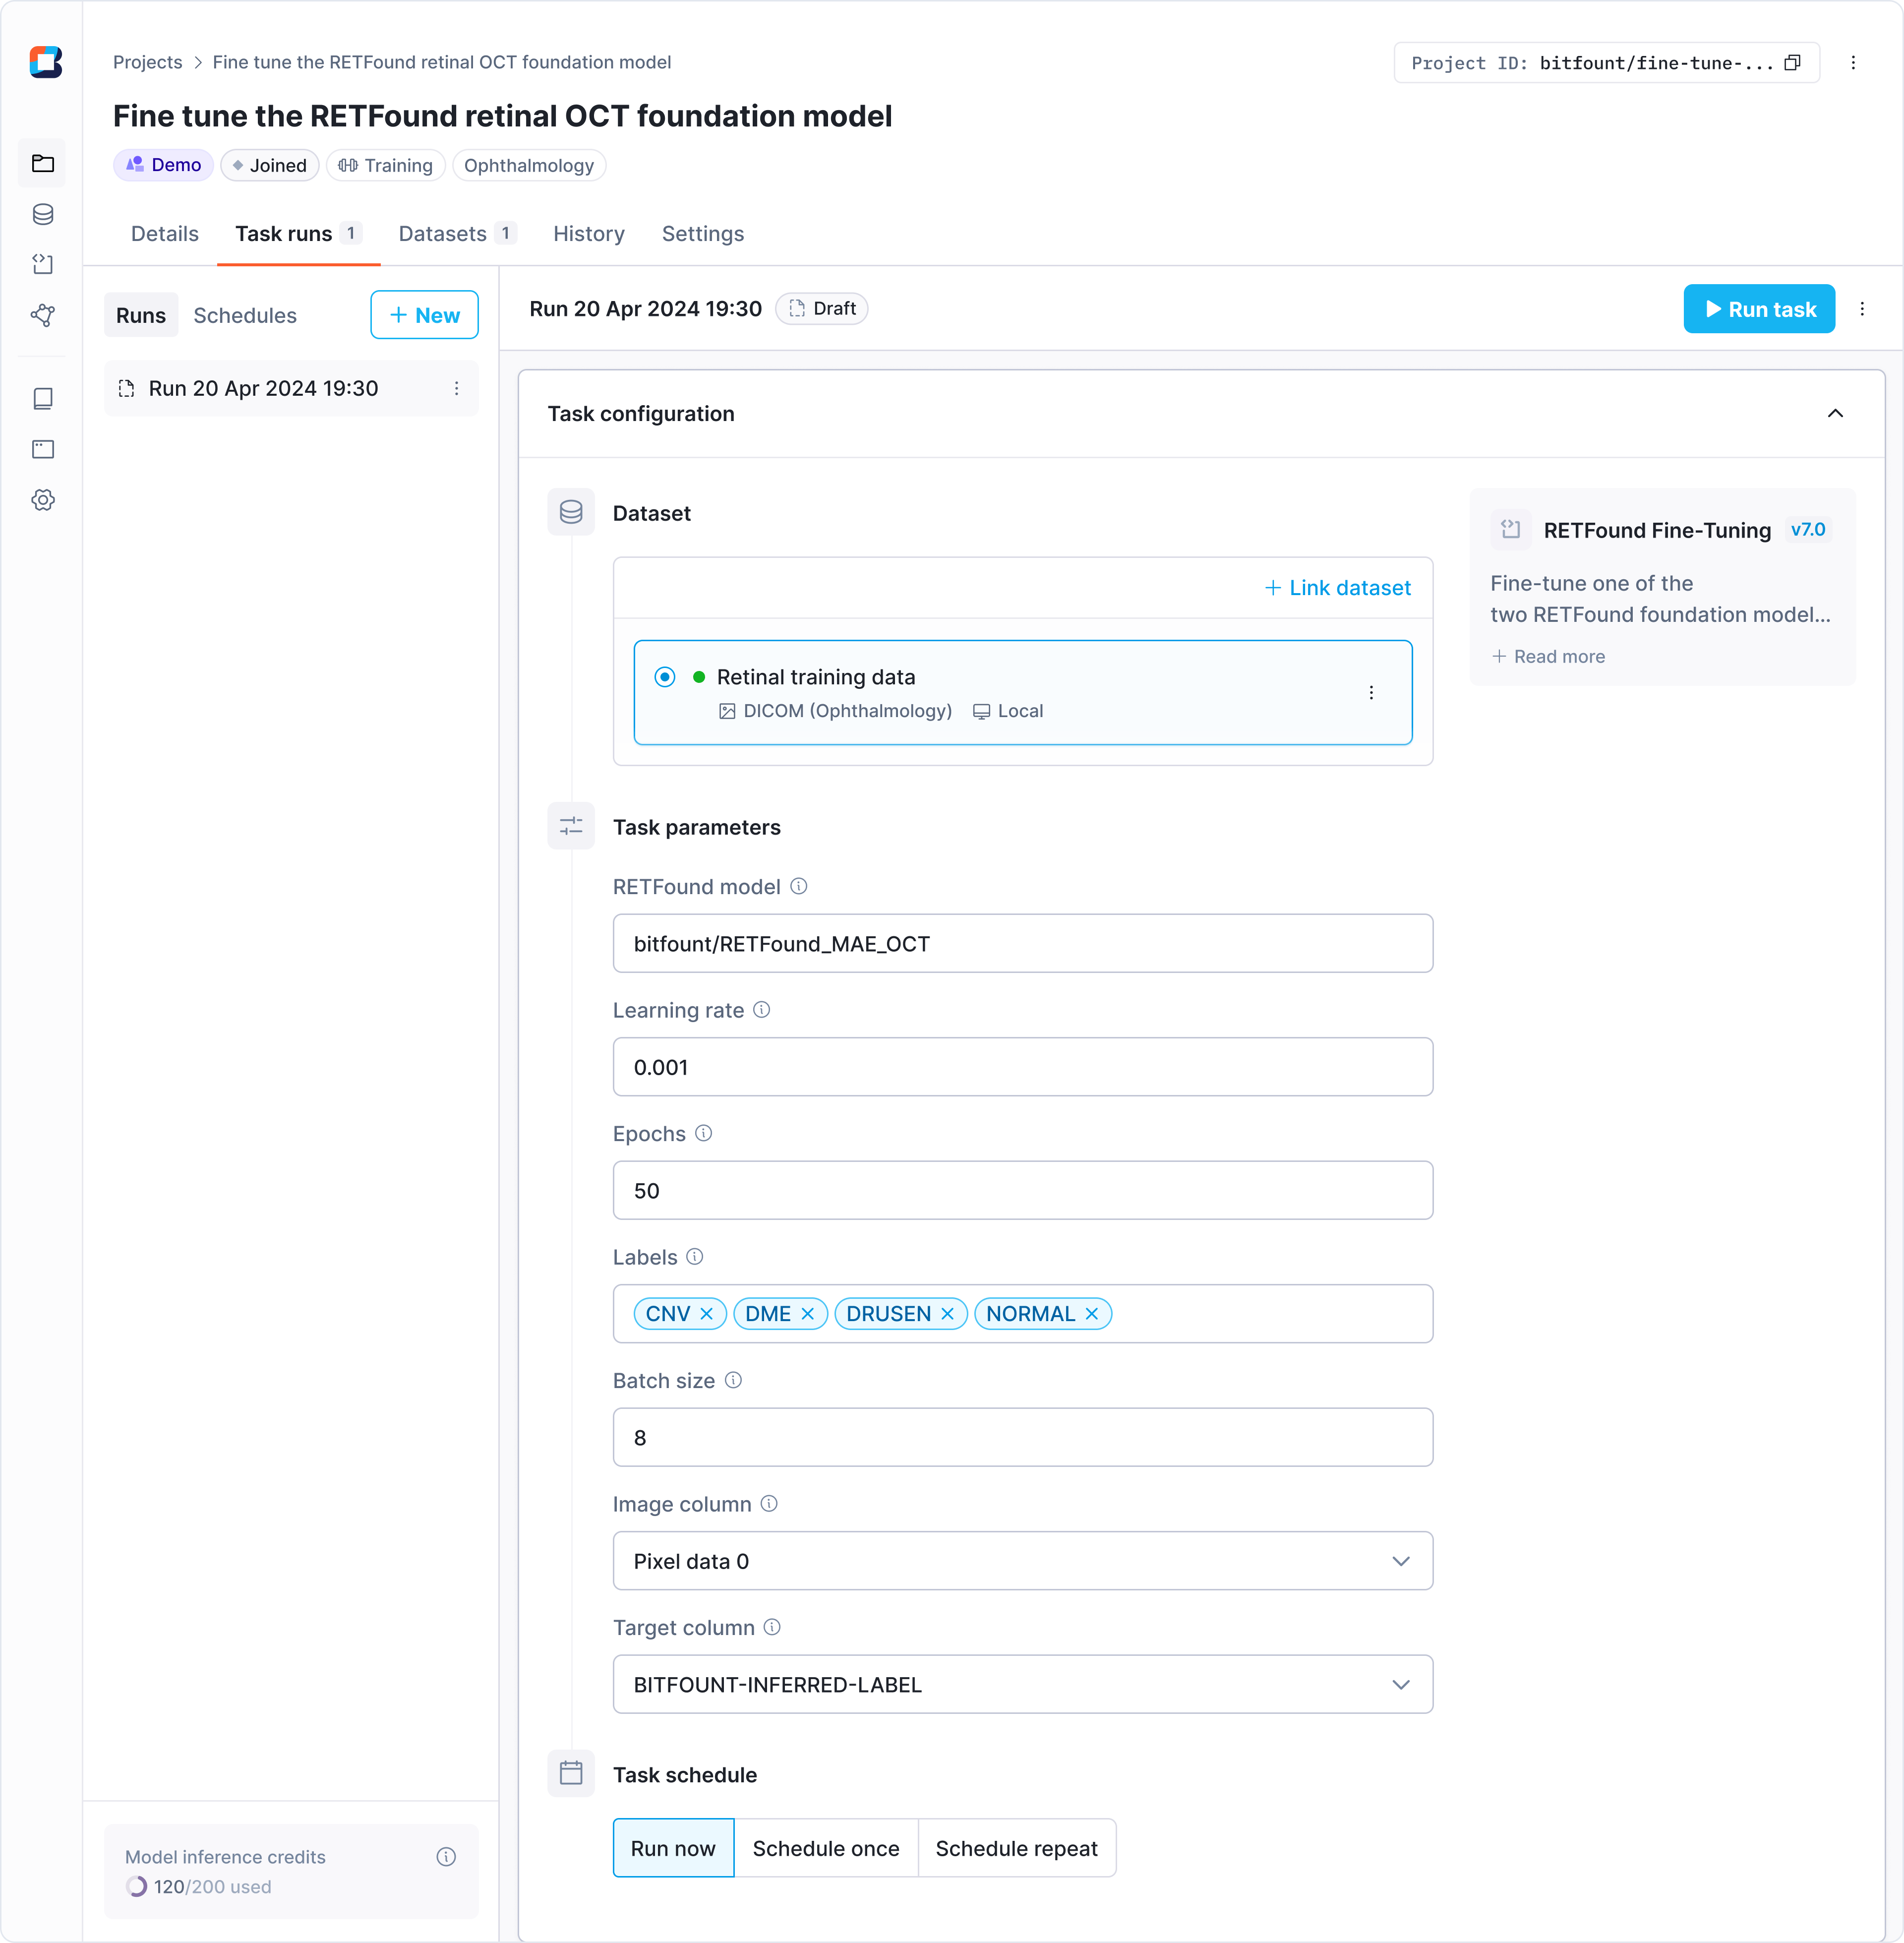
- Set task parameters:
| Parameter | Description |
|---|---|
| Learning rate | Controls how quickly the model learns. A lower value means slower but steadier learning, while a higher value speeds things up but can make learning less reliable. |
| Epochs | The number of times the model goes through the entire dataset. More epochs can improve accuracy but also increase training time and risk overfitting. The RETFound paper suggests starting with 50 epochs. |
| Labels | Enter the class labels you defined in your training dataset folder structure. Choose conditions you have sample data for, or test with any labeled public dataset. |
| Batch size | The number of samples processed before updating the model. Larger batches can speed up training but require more memory. |
| Image column | The dataset column that contains image data for model training and fine-tuning. The default is Pixel Data 0 unless configured differently. |
| Target column | The dataset column that contains the image labels. The default is BITFOUNT-INFERRED-LABEL unless specified otherwise. |
- Run the task. Task processing time will depend on a number of factors including the size of data you connected, the batch size, the number of epochs, your machine's processing capabilities and more.
- Once the task completes, review the results by navigating to the task run.
The output includes a CSV file summarising the learning process, and three
checkpoint files, including the
model_best.pthcheckpoint file, which represents the highest-performing fine-tuned model. Themodel_best.pthcheckpoint file can be used in subsequent projects to obtain predictions on unlabelled images.

Step 3: Run inference on new data
Now that you have fine-tuned RETFound, it's time to test it on unlabelled images!
Preparing the test dataset
- Curate a folder of new images (no need to add class labels).
- Connect the dataset to Bitfount.
Do not check the option Use folder name and structure for training tasks
Running inference
Inference is the process of using your fine-tuned model to analyse a new dataset. During this step, the model will classify each image based on the categories it was trained on, generating predictions as output.
- Join the RETFound inference demo project (Classify retinal images using RETFound and a local checkpoint file).
- Link the test dataset you prepared.
- Set task parameters:
| Parameter | Description |
|---|---|
| Model version | Ensure it matches your dataset type (e.g. Color Fundus or OCT). |
| Class outputs | Use the same labels defined during fine-tuning. |
| Checkpoint file | Select the model_best.pth checkpoint file from your fine-tuning results. |
| Image column | Defaults to Pixel Data 0, unless configured differently. |
- Run the task.
Interpreting predictions
The task results are provided in a CSV file for easy review. This file includes metadata about your input images, but the most important columns are:
- First column: The file path of each image.
- Last columns: The predicted probabilities for each class (the number of these columns depends on the classes defined during fine-tuning).
Each score represents the model's confidence that an image belongs to a specific class. The values for all classes will sum to 1, with higher numbers indicating greater confidence in the model's prediction.

FAQs
What is a foundation model?
A model trained on a broad dataset (over 1 million retinal images) that can be fine-tuned for specific tasks.
What is fine-tuning?
Training an existing foundation model on a specific dataset to specialise in a particular task.
What are classes?
Categories a model classifies images into (e.g. 'Diabetic Retinopathy' vs. 'Normal').
How many images do I need?
Start with at least 100 images per class, though more data improves performance.
What kind of images can be used?
There are two versions of RETFound, one that runs on fundus images, while the other facilitates the use of OCTs. It's worth noting that the model does not classify volumetric scans and therefore will only run on single B-scans.